There are many projects that a homeowner can do themselves, including refinishing cabinet doors. It’s best to hire a professional for larger jobs such as spray painting cabinets in your kitchen with solvent-borne lacquer.
San Jose Cabinet Refinishing is less expensive than replacing or refacing your cabinets. Refinishing also allows you to keep the existing cabinet boxes while updating your kitchen’s look.
Preparation
Refinishing is a process that involves removing or stripping the existing stain or paint from cabinet doors and then applying a new coat of your choice. Typically, this will result in painting or staining the doors a darker color, though you can also go from light to dark or to a solid color. Refinishing is less labor intensive than brushing the cabinets, but it will still require a lot of prep work and will need to be done carefully to ensure clean lines and spotless spaces.
It is important to completely empty out the cabinetry and remove all hardware and hinges so that you can properly work on the doors and boxes separately. This will make it much easier to return the door back into place after the refinishing is complete. Also, it is a good idea to mark the hinges and door edges so that they will be easy to reinstall once everything is finished.
Next, you will need to clean the cabinets thoroughly to make sure that they are ready for their new coat of paint. This will involve using a degreaser solution or trisodium phosphate (TSP), which can be purchased at many hardware and home improvement stores. Once the cabinets are completely cleaned, they should be sanded down to provide a smooth base for the new finish. This step is essential to getting a smooth, even coat of paint and will improve adhesion between the original surface and the new coating.
It is also a good idea to prime the cabinets before they are painted. This will create a smooth base for the paint and will help to prevent chipping and peeling down the road. It is important to choose a high-quality primer that will work well with your cabinet material and follow the manufacturer’s instructions for proper application and drying times.
Cleaning
Cabinet refinishing is a time-consuming, labor-intensive process. It begins with removing cabinet doors and drawers, then carefully labeling them for reassembly later. Next, all surfaces are covered to protect them from dust and debris. The cabinets are then cleaned with a mixture of synthetic steel wool, soap, and trisodium phosphate (TSP), which emulsifies grease. This step is crucial for ensuring that your new finish adheres properly to the cabinets. It also helps prevent any future peeling and chipping.
Primer
There are a few different types of primer available. Each type has its own pros and cons. Stain-blocking primers are good for hiding stains and preventing them from bleeding through the new paint color. They are great for cabinets with nicotine stains or water damage. Adhesion primers create a strong bond between the surface and the new paint, which helps prevent peeling. They are a good choice for glossy surfaces like laminate or new wood. Oil-based primers are the best at stain blocking and adhesion, but they are high in VOC (volatile organic compounds) so they can be stinky and require special cleaners to clean up.
A water-based or latex primer is a DIY favorite because they are easy to work with and dry quickly. They have low VOCs and can be cleaned up with soap and water. They can be used on a variety of surfaces, but may not seal as well as other options.
The best primer for cabinet refinishing depends on what type of finish you are going to use on the cabinets, and what condition they are in. If you are painting over a light color, choose a stain blocking primer to ensure that the new paint won’t show through. For cabinets that are darker, a high adhesion primer will help the topcoat adhere.
For a great multi-surface primer, try KILZ 2 All-Purpose Primer. It works on all surfaces, including wood and composites, and can cover stains and previous colors. It is mold and mildew resistant, has low odor and is ready for a topcoat in 1 hour. When in doubt, a professional can recommend the best primer for your project.
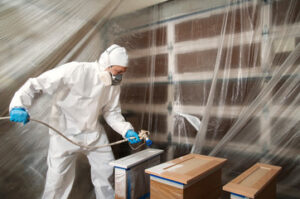
Paint
The paint used for cabinet refinishing needs to be tough enough to stand up to frequent cleaning and moisture. It can also need to hide imperfections and light wear and tear.
There are a variety of different cabinet paints available at home improvement stores and at paint specialists. They come in a range of sheens from flat or matte finishes to satin, semi-gloss, and gloss. The higher the sheen, the more durable the finish. Glossier finishes also show up imperfections more readily.
Traditionally, oil-based paint has been the most durable for cabinets. However, it’s not as readily available anymore and can be more difficult to work with than water-based finishes. Plus, it releases toxins such as volatile organic compounds (VOCs), which can be bad for the health of anyone who works on the project.
Some cabinet refinishers use a special urethane-acrylic formula called INSLX Cabinet Coat for their projects. This is a hybrid paint that provides a hard finish, levels into large open wood grains well, and doesn’t leave as many roller marks as some other cabinet paints. It’s also available in almost any color you can imagine and is low VOC.
Other DIYers prefer to go with a water-based acrylic formula that can be bought at home and hardware stores. These types of paint are usually the best for cabinets because they require minimal sanding, clean up quickly with soap and water, and dry through evaporation rather than being baked on like other acrylic paints can.
A popular trend in kitchen design is to restyle or even “faux” the look of cabinets by adding crackling glaze and other textures. This technique can add a rustic, country or provincial feel to the kitchen with very little time and effort, while still giving you a fresh, updated look.
Assembly
Cabinet refinishing is an excellent DIY option for those looking to upgrade their kitchen. Unlike cabinet refacing, which replaces your current doors and drawer fronts with new materials, refinishing concentrates on transforming the existing pieces via repainting or staining. It’s important to understand that refinishing requires more work than refacing, as you need to strip or sand your cabinets before applying the paint. This process can be time-consuming, especially if you’re going from a light to dark color.
During the refinishing process, it’s crucial to have your supplies organized and ready to go. Start by removing all hardware from your cabinets and labeling each piece for easy reassembly later. Set up a staging area to clean your cabinet boxes, and cover any backsplashes or appliances to protect them during the cleaning and painting processes.
Once the cabinets have been refinished and allowed to dry, it’s time to install your new cabinet doors! Use your labeling system to match each door with its proper hinge, and then reattach the knobs or pulls.
If you’re feeling particularly creative, consider switching out the old hardware with a set of stylish new knobs or pulls to finish off your new look! Then enjoy your new and improved kitchen.
Taking on an at-home cabinet refinishing project can be a huge undertaking, but it is very doable with the right amount of preparation. Using the right products and techniques will ensure that your work lasts for years to come, so it’s well worth the effort!